Sunday, 6 February 2022

Runeberg cakes - a Finnish birthday party treat!


Towards the end of January, small cakes appear in shops and cafes across Finland.  Runeberg cakes (Runebergin Tortu in Finnish) are baked to celebrate the birthday of Finland’s national Poet Johan Ludvig Runeberg (1804-1877) on the 5th February. Every year around the date of his birthday, these exquisite little cakes are sold all over Finland and are hugely popular. Runeberg actually wrote his poetry in Swedish, as this was said to be the language of educated people in 19th century Finland. The well-loved poet spent most of his life in Porvoo, which is situated about 50 kilometres to the east of Helinski. It’s one of the six medieval cities in Finland and a beautiful place to visit.

Photo https://commons.wikimedia.org/

Who created the recipe?

In Porvoo, a local pastry baker named Lars Astenious is reputed to have developed the recipe for Runeberg cakes in the 1840s. There is another story that the cakes were created by the poet's wife Fredrika, as the recipe was written out in her cook book from the 1850s. She made the cakes from flour, breadcrumbs, biscuit crumbs and almonds, decorated with jam and icing but it was most likely she adapted her recipe from the one by the Porvoo baker. Runeberg is said to have eaten the cakes for breakfast with a glass of punch.


What are Runeberg cakes?

Runeberg cakes are small and cylindrical shaped, with a moist, almond flavoured sponge, topped with a circle of white icing with raspberry jam. The topping gives them their distinctive look.

 How to bake

There are numerous versions of the recipe for Runeberg's cakes but this one comes from Finnish friends. You will need a small cake or muffin tin (approximately 5cms diameter for each individual mould).

 125g butter

85g caster sugar

1 egg (beaten)

110g (plain) flour

1 tsp baking powder

50g ground almonds

50g breadcrumbs

1 tsp cardamom (husks removed and ground)

Pinch of salt

100ml double or whipping cream

50 ml water, lemon or orange juice

Amaretto (optional) 

 Preheat the oven to 180C. Cream the butter and sugar and add the egg gradually. Mix the dry ingredients (flour, baking powder, ground almonds, breadcrumbs, cardamon and salt) and add these to the creamed mixture.  Pour in the cream and the water or juice to make a thick batter. Grease the individual moulds and pour the batter into each one until they are about half filled. Bake in the oven for about 15 minutes or so until done. Remove and brush the top of the cakes with Amaretto (if used). Allow to cool.

 To decorate

Icing sugar

Water

Raspberry jam 

 Cut a hole in the top of the cakes and insert a teaspoonful of raspberry jam into each hole. Make a thick paste from the water and icing sugar. Roll out the paste and cut strips for the top of the cakes or pipe the paste around the top with a piping bag.

 Fly the flag with our Finnish friends and try out these lovely little cakes. They certainly brighten up a dull February day. Happy birthday to Johan Ludvig Runeberg!

Friday, 14 January 2022

What’s the difference?

 
Granola Fruit Bars

I’ve always wondered what the difference is between flapjack and granola fruit bars. They seem quite similar though it’s typically the texture that stands them apart. Flapjack tends to be softer whereas a Granola fruit bar has a crunchier bite. I’ve made lots of versions of flapjack with my grandchildren, where you bind the oat mixture with butter and golden syrup to give that chewy texture. Marmalade Flapjack  is a definite favourite.

So, when we were found a recipe for Granola, we were keen to try it out. This time, it’s honey which binds the mixture alongside the melted butter. There are lots of options with the dried fruit and nuts to suit your taste in this recipe so it’s good to choose what you like best.

Granola Fruit Bars

150g butter

100ml runny honey

75g soft brown sugar

250g rolled oats

150g dried apricots, cherries, cranberries or dates or a combination

100g desiccated coconut

60g chopped nuts e.g. pecans, pistachios or hazelnuts (optional)

1 tbsp chia or sesame seeds 

Preheat the oven to 180C/360F/Gas 4. Melt the butter, sugar and honey in a pan over a medium heat. Add the rolled oats, dried fruit, coconut, nuts and seeds. Stir well so that the mixture is well combined. Put the mixture into a greased 20cm square baking tin and press it well into the corners. Smooth the top. Bake in the oven for 20 minutes until golden-brown. Remove from the oven and allow to cool. Turn out of the tin and cut into equal-sized bars.

We liked the fruitiness in these bars which were perfect to take on a walk or cycle or a snack on a day out. Quite an energy boost too!  Why not try out several versions with variations of fruit, nuts and seeds or even be daring with some chocolate chips? Enjoy!


Sunday, 5 December 2021

Build it better!


I always enjoy making a Gingerbread House and with a little help from Grandma’s Gingerbread recipe and a Gingerbread House cutter kit, you can build a brilliant one. 

Gingerbread Recipe 

What you need
110g/4oz butter

75g/3oz soft brown sugar

4 tbsp golden syrup

300g/110zplain flour

1 tsp bicarbonate of soda

2 tsps ground ginger


How to bake

Preheat the oven to 180°C, Gas mark 3, 375F. Line a baking tray with baking paper. Melt the butter, sugar and syrup in a pan. Then remove from the heat. Sieve the flour, bicarbonate of soda and ginger into a bowl and stir the melted mixture into the dry ingredients to make a stiff dough. Roll out the dough about 5mm/1/4 inch thick. Use Gingerbread house kit cutters to make the shapes of the walls, roof and doors of the house. Don't forget to make the gingerbread people and gingerbread trees.  Place the shapes onto the lined baking trays and bake, in batches, for 9-10 minutes until light golden brown. Remove from the oven and allow to cool on a wire rack. 


How to assemble and decorate

Whisk 2 egg whites until stiff and sift in 500g icing sugar. Then stir to make a smooth icing. Spoon this mixture into a piping bag with a small to medium nozzle. Then pipe along the wall edges to join them together. You can place a small bowl inside to support the house for 2 to 3 hours until it dries out. Then, remove the bowl and fix on the roof sheets in the same way. Leave to dry overnight. 


Decorate by piping more icing around the doors and windows and sticking on any of the following : coloured sweets, silver balls, chocolate buttons and flaked almonds. The Gingerbread House should last for about a week – well unless it’s eaten before then!


Here are more of Grandma Abson's recipes with ginger :

Gingerbread Biscuits

Ginger Shortbread Biscuits

Gingerbread Cake

Grandmother Gingerbread (Peggy Burton)

Ginger Buns

Raisin Gingerbread Loaf  


and check out Grandma Abson's favourite 

Christmas recipes


Enjoy and a have a very happy and safe Christmas!

Wednesday, 3 November 2021

Parkin Pigs have all the fun

 
Parkin Pigs

It was a fun time showing the young people at the local Youth Club how to bake Parkin Pigs in preparation for Bonfire Night. The recipe for this special Yorkshire treat originates from a Grandma in the Bradford area and these scrumptious gingerbread biscuits have become popular all over West Yorkshire. You need a cutter in the shape of a pig and these are quite easy to find online but if not, you can always cut out a version in card or get creative - after all it's only just been Halloween and All Souls Day.

What you need

110g/4oz butter

110g/4oz soft brown sugar

50g/2 oz black treacle

110g/4 oz golden syrup

225g/8oz plain flour

1 tsp bicarbonate of soda

3 tsps ground ginger

Decoration for eyes (e.g. dried fruit)

How to bake

Melt the butter in a pan with the treacle, golden syrup and sugar. Mix together all the dry ingredients. Add the liquid from the pan to form a paste. Leave to chill for 30 minutes. Roll out and cut into rounds and place on a baking tray. Bake in a warm oven for about 8-10 minutes. (350F, Mark 4, 180 C).  

Meryl says : The secret is in the texture of the paste which should be sticky and moist so don’t let the melting treacle, butter and sugar boil. Just like Yorkshire Parkin, these biscuits get better if you leave them a day or two in an airtight tin or container. But they didn’t last long – in fact, the young people barely waited until they were just out of the oven to devour the lot! Later in the week, we’ll be making sausage rolls and toasting marshmallows – yum!

And Remember, Remember ... Grandma's recipe for Parkin for 5th November!

Monday, 11 October 2021

Get Scary with these Scarecrow Biscuits


I always think that October heralds a new season of baking with warm aromas and colourful spices such as ginger, cinnamon and nutmeg to embrace. There are so many festivals, both religious and cultural in the calendar which call out to our baking repertoire. I love this recipe for Scarecrow Biscuits which appeals to children of all ages and sets the scene for Harvest festivals and Halloween. You can use a variety of cereals, candy or liquorice to decorate your creations. 

What you need …

½ lb/225g plain flour

5 oz/150g butter

2 oz/50g caster sugar

1 lemon (zest and juice)

4oz/110g Icing Sugar

Warm water

Malted wheat (or similar for hats and mouth)

Raisins (for eyes and mouth)

Glace cherries (for nose)

How to bake …

Pre heat the oven to 180C or 160C fan Rub the flour and butter to resemble fine breadcrumbs. Add the sugar, grated lemon zest, and then the lemon juice.    Mix to a dough, and leave to chill for half an hour. Roll out to ¼ inch thick, and cut out the biscuits. Bake for 12-15 minutes until golden-brown. Leave to cool on rack.

How to decorate ….

Make up a small amount of glace icing with the icing sugar and warm water. Use this or Raspberry Jam to glue the assorted decorations for the scarecrows’ hats, eyes, nose and mouth.  

Meryl says : You can spice these biscuits up by adding a dash of ginger into the glace icing. Make the biscuits as scary as you like. Add this recipe to Half term baking. Go on - get creative!

More ideas from Grandma Abson’s Recipes for baking in October :


Tuesday, 7 September 2021

Bring on the Green Tomatoes


With more of us interested in growing our own produce, September also brings the age-old problem of what to do with gluts of fruit and vegetables. Grandma Abson’s mantra was ‘Waste not want not’ and when this happened, nothing ever went to waste.  She made chutneys and pickles to last through the winter as a perfect side dish with hot and cold dishes.

So, armed with a load of green tomatoes when the sun didn’t shine and were about to succumb to blight, I consulted one of Grandma’s collection of cookery book for a suitable recipe. Home-made chutneys are very easy to make and this recipe is based on her 1930s baking splattered copy of ‘Modern Cookery Illustrated’.

Green Tomato Chutney

2 lb/approx 1 kg green tomatoes

2lbs/approx. 1 kg apples

1 lb/450g demerera sugar

1 lb/450g shallots

2 oz/50g garlic

1/2lb/450g sultanas

2 tbsps of ginger (chopped finely) or ground ginger

6 red chillis (chopped finely)

1 tbsp salt

1 tsp mustard seed

1 pint/ml vinegar (cider or white wine vinegar)

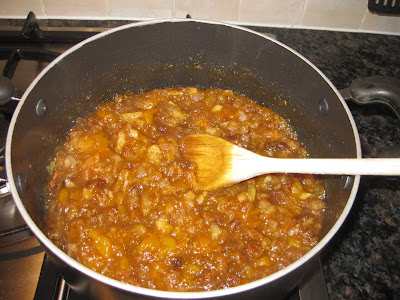
Quarter the tomatoes. Peel and core the apples and cut into pieces; peel the shallots and garlic. Mix together. Place in a large pan and add the other ingredients. Bring slowly to the boil, then simmer for about 1½ hours, stirring until the ingredients are thick and soft. Allow to cool. Spoon into clean jars and cover securely.

Grandma Abson’s tips : Chop the tomatoes and onions finely or put them through a mincer if you want the final consistency of the chutney to be smooth. To test if the chutney is ready, draw a wooden spoon across the bottom of the pan. If it’s ready, the chutney must not flow back into the gap left behind by the spoon. If not, then check every 5 minutes or so until the gap is clear. Chutney needs to cool slowly so the spices infuse and flavour the fruit. You can add more ginger and other spices such as mustard seed, coriander or cumin to make it even spicier. 

Check out more of Grandma Abson’s Chutney recipes

Apple Chutney

Cranberry & Apple Chutney

Mango & Apple Chutney

Mango Chutney

Rhubarb & Ginger Chutney

Friday, 13 August 2021

The perfect Afternoon Tea


I always enjoy doing my Heritage Baking talk about the History of Afternoon Tea. There are key components to consider as well as some historical characters who shaped the story and make it the tradition we so much enjoy today. We’ve certainly missed having the experience of Afternoon Tea over the past eighteen months or so, whether it be for a birthday, anniversary, wedding or many other celebrations with family and friends.

According to some, there aren't any rules but Mrs Beeton did leave a mountain of instructions about how to serve Afternoon tea in her book entitled ‘Household Management’. She stipulated that when a Victorian hostess invited guests to partake of this experience at their home “Afternoon tea should be provided, fresh supplies, with thin bread-and-butter, fancy pastries, cakes, etc., being brought in as guests arrive.” And when it comes to the order of the food on the famous 3 tiered cake stand, it should comprise a bottom tier of sandwiches with crusts cut off, a middle tier of scones or teabreads and a top tier of exquisite cakes, pastries, petits fours or biscuits.

The historical characters in the story include Catherine of Braganza, whom it is alleged brought a chest of tea as a dowry when she married Charles II; the Earl of Sandwich who spent much of his time at the gambling table so didn’t have time to eat a proper meal; and Anna Maria, Duchess of Bedford who had a ‘sinking feeling’ about 5 o’clock one afternoon and called for something to assuage her pangs of hunger. Hence the tradition started which we recognise today.

I’ve delivered this talk so many times now and have had so much fun telling the anecdotes about it all. The talks have often been linked to fundraising events so I have very fond memories of some amazing people who set them up. Since March 2020, I’ve also put on my posh frock, hat and gloves and done this talk on Zoom to the delight of even more groups. I really hope it’s not too long before I can do it ‘live’ again, Covid safety regulations permitting.

This week in mid-August is Afternoon Tea week so I hope you can enjoy your version of Afternoon tea during August and if you can join one of the fundraising campaigns that would be perfect. Stay safe!

Friday, 16 July 2021

A cheerful summer Apricot bake

I’m always very pleased to receive an old cookery book and this one came from a friend’s mum. Entitled ‘Teatime Cookery’ and published in the 1970s, it’s a treasure trove of easy tasty bakes and old family favourites. What I like about these recipes is the simple list of ingredients, most of which I have in my stock cupboard, so I can be quite spontaneous about what to bake. Glancing through the pages, I chanced upon ‘Aunt Emily’s Apricot Cake’. The ingredients were enough for a 15 cms/6 inch cake or a 450g/1lb loaf size but I wanted to make a larger version, so I adapted the amounts to do this. I added demerara sugar before baking to make a crunchy topping.

Aunt Emily’s Apricot Cake

300g self-raising flour

200g butter

200g caster sugar

50g mixed peel

300g dried apricots (chopped small)

3 eggs (beaten)

2 tbsps milk

2-3 tbsps demerara sugar for topping

Preheat the oven to 180C (170C fan)/Mark 4/350F. Line a 21 cm/8 inch cake tin or 1 kg/2lb loaf tin with baking paper. Rub the butter into the flour until the mixture resembles breadcrumbs. Stir in the sugar, mixed peel and apricots. Mix in the eggs and milk. Put the mixture into the cake/loaf tin. Sprinkle demerara sugar on top. Bake in the oven for 60-70 minutes until a cake tester comes out clear. Leave in the tin for 10 minutes for about 10 minutes before turning out to cool on a wire rack.


Meryl says : Apricots are one of my favourite summer fruits so I really love this recipe and it’s so quick to make. It’s a great summer recipe but with dried apricots, we can bake it at any time of year. Acknowledgements and thanks to Aunt Emily for her original recipe.